Limoncello

Homemade Limoncello

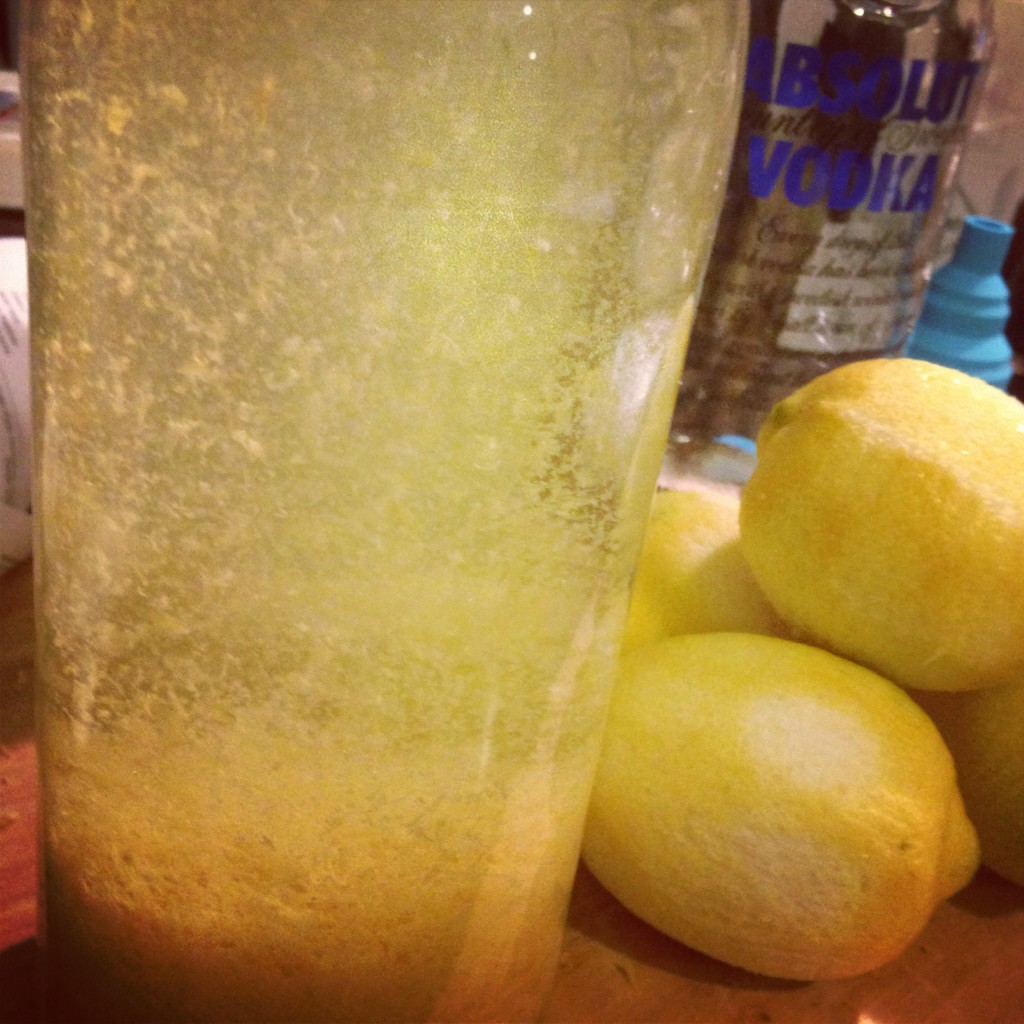
It’s Christmas time! My second favourite time of the year to Chinese New Year mostly because of all the special food you get to make and eat. I’m about to churn out a lot of goodies for several parties and here’s just one thing on the menu which is dead easy to make in advance. What a beautiful alcoholic lemony snow globe.

Limoncello:
500 ml vodka
500 ml vanilla vodka
Zest of 6 unwaxed lemons
500 g caster sugar
200 ml water

Decant the vodka into a large container or bottle. Zest the lemons and mix the zest into the vodka.

Use a funnel and get the sugar into the vodka. Leave for a week while turning and mixing it up occasionally. After a week, sieve off the zest and decant your limoncello back into bottles. It’s at this point you can add the water if the mixture is too thick. Finally add a twirl of lemon zest as decoration. This will only get better with age and I’m meant to leave it for another week. But by golly it’s already so damn tasty, I don’t know how to resist!

Salted Caramel Sauce

salted caramel sauce

Good grief. Do you know what I realised? Minikin Kitchen is 1 year old today! It’s been an interesting experiment into cooking and blogging. I just discovered a recipe of mine doing the rounds on Pinterest which is rather exciting. As I started this thing on Halloween and I’m prepping some treats for a Halloween party tomorrow, I thought I’d post something that I just knocked up. Be warned this stuff is way too ‘I’ll just dip my pinky into it’ addictive and anyone *anyone* who tells you they don’t like salted caramel is a bloody liar.

Salted Caramel:
1/2 cup caster sugar
1/2 cup light brown sugar
110g butter
1/2 cup double cream
1 tbsp sea salt flakes

On medium to high heat, get a heavy bottomed stove on and melt your sugar. With a metal spoon, only stir the sugar occasionally to help it all dissolve evenly. If you want to use a sugar thermometer, you want this to reach 175°C but I have to admit, I kinda eyeballed this. You want it a rich golden brown colour and basically don’t want it to burn. Once it reaches the desired temp, add the butter and double cream and stir well. Now add the salt and set this aside to cool.

The temperature of the sugar really dictates the viscosity of this sauce, you’ll notice I’ve made a bit on the fudgy side, but if you want a runnier constancy add more double cream. I basically add this to most things. I drizzle it over yogurt, ice cream, pancakes, filled macarons with it…I even put it in the freezer to firm up and rolled little salt caramel balls and stuffed them in homemade chocolate truffles (stroke of genius if I do say so myself).

Addictive and indulgent. A fitting birthday post.

Charred Aubergine with Tahini & Yogurt

Charred Aubergine Dip

I’ve just come back from Puglia in the south of Italy with a group of friends. It was a cycling trip where we essentially cycled our bikes, swam in the azure seas and cycled some more until we were hungry, then proceeded to eat and drink an awful lot. The food there is so earnest and simple. They have access to some of the most incredible ingredients in the world because of their amazing climate, so they’re only interested in basic cooking to elevate the natural flavours. I’m really in to that.

Back in London we are in the midsts of this weird Summer vibe where it seems that the general en-mass willing of summer not to be over *just* yet has resulted in some pretty warm october nights. This dip is something I prepared as part of a romantic picnic in the summer solstice, so it seems only fitting to revisit it again with the warm hazy glow of Puglia and my own Londonian attempts to squeeze the very last of summer out. It’s simple and delicious.

Charred Aubergine with Tahini & Yogurt (Serves 2-4):
1 large aubergine
70g tahini paste
60 ml water
1 tbsp pomegranate molasses
1 generous squeeze of a lemon
1 garlic clove - crushed
3 mini cucumbers - diced
seeds from half a pomegranate
3 tbsp parsley - roughly chopped
2-3 generous dollops of greek yogurt
a drizzle of olive oil
1 tsp paprika
salt and pepper

On a gas hob, place the aubergine directly onto a medium flame and roast for 12-15 minutes, turning frequently. The flesh should end up soft and smoky with the skin burnt all over. Alternatively, if you haven’t got gas hobs, crank up that oven high, 200°C maybe, and whack your aubergine in and keep turning it in that heat. 20-40 minutes in, the skin should also char and the aubergine should sag telling you the flesh is all lovely and soft. On a similar warning to my last aubergine post: Poke a couple of holes near the stem part of the aubergine to stop it exploding in the oven.

Once your aubergine is done, transfer all that lovely soft flesh into a medium mixing bowl. To this add the tahini, molasses, water, lemon juice, garlic, cucumber, parsley, paprika, yogurt, half the pomegranate seeds and some salt and pepper. Adjust the seasoning to your liking. Drizzle with olive oil and the rest of the pomegranate seeds to finish. Eat!

Vietnamese Grilled Aubergine with Nouc Cham Sauce

vietnamese grilled aubergineIt’s been too hot in my flat. So all I want to cook of late is dips, salads and wraps. Oh Vietnamese food, you have so many dishes I adore under this category…

Aubergines are in season and this dish is one of my favourite and simplest dishes to rustle up with said veg. But mostly its the delicious nouc cham that I love, so crack open an empty jam jar and make a load of this addictive sauce.

Nouc Cham Sauce:
100 ml fish sauce
100 ml of water
125 g brown sugar
4 cloves of garlic - minced
4 bird's eye chillies - deseeded and finely chopped
Juice of 1 lime
1 carrot - finely shredded

Mix up the fish sauce, sugar and water. Add to this the garlic, chilli, lime juice and shredded carrot. Thoroughly stir it all up and keep it in the fridge until you’re ready to use.

Now you’re ready to grill your aubergine.

Grilled  Aubergine:
1 large aubergine
3 tbsp nouc cham sauce
Handful of peanuts - toasted
1 tbsp spring onions - finely chopped
Some coriander to garnish

Get the grill on high. Pierce your aubergine near the leafy bits a could of time to stop the Exploding Aubergine from happening (this has happened to me twice…I had to scrape the oven clean of the perfectly cooked bits of veggie shrapnel). Put the whole aubergine in whole and just keep an eye on it, turn it ever so often and the skin doesn’t burn beyond the nice charred flavour. Depending on your oven and grill it should take about 20-40 minutes. If you want to can oven roast it first at around 200°C then finish it off on the grill. Once it soft and sagging you’re ready!

Place the aubergine on a dish and slice it open. Add to this the nouc cham sauce, the toasted peanuts, coriander and spring onions.

Salmon with Ratatouille and Sweet Potato Mash

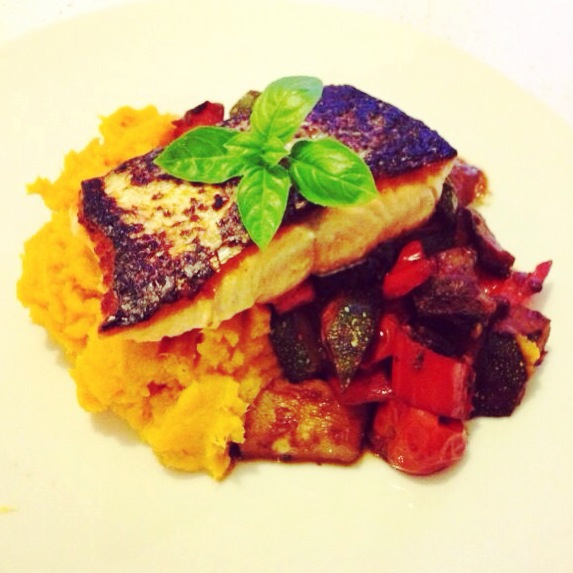
salmon fillet with ratatouille and sweet potato mashOh man. Bookkeeping. Running your own freelance business does have it’s down sides. But amazingly after travelling along a floor of invoices and receipts and living in what clearly appeared to be a really specific Level Of Hell (floor 14 perhaps) I’ve discovered that for the past six months my books totally balance out and everything is pretty healthy looking in the expenses department. Huh. Mazing.

I’m a very particular type of stress cooker, and this was making a lot of appearances for the last couple of nights at around midnight and it’s pretty tasty so I thought I’d share. It’s for one, but you can easily double this.

Salmon with Ratatouille and Sweet Potato Mash:
1 salmon fillet
1 sweet potato - peeled and chopped
round courgette - sliced irregularly
1 red sweet pointed pepper
handful of cherry tomatoes - halved
glug of red wine
2 tbsp olive oil
splash of milk - I went rice milk
1 bay  leaf
1 garlic clove - crushed
1 small chilli - deseeded and finely sliced
1 tbsp tomato purée
pinch of oregano
pinch of rosemary
pinch of paprika
sea salt flakes
crushed black pepper

You’ll want to make you ratatouille first. I’ve suggested that you cut your courgette ‘irregularly’ because I have a weird aversion to perfectly square bits of courgette and I think the odd angles you cut in produce a nicer bite. So that’s your courgette. Slice your pepper however the hell you like.

1 tablespoon of olive oil in a pot on medium heat, to this add your crushed garlic, sliced chilli, bay leaf, oregano, rosemary and paprika. Then when all the spices start smelling lovely add your courgette, tomato and pepper. The eagle-eyed of you will notice there are no onions or aubergines in this dish. You can of course add these if you want, I simply didn’t have any at home. Add your glug of wine. Cover and stew while you deal with the mash. Keep an eye on this, you don’t want it to burn. Maybe add water or stock if it’s drying out too much.

To a pot of slightly salted boiling water, add the sweet potato and let that get nice soft. When it’s soft enough to mash with a fork (or mash-up with the mash attachment on your hand blender…what an awesome buy) drain and mash away. Season with some salt and pepper, and add a splash of milk or butter maybe. Keep warm and set aside.

Now cook your salmon fillet. Frying pan on the stove, high heat, tablespoon of olive oil in and wait for the oil to get really nice and hot before you put your fillet in skin side down. Fry for 2-3 mins, then cook the sides for about a minute each. Finally turn it over and cook the base of the fillet for a minute, switch your fire off and season the fish with a bit of sea salt and crushed black pepper. Prep your plate and dish up. That time it took for you to dress your plate should mean your fish is just cooked.

Rhubarb Crumble with Ginger (and possibly Greengages) as well as Real Custard

Rhubarb & Ginger Crumble

Rhubarb! Yay! Let’s make a crumble. I also very recently learned that rhubarb is used in traditional Chinese medicine, so it feels like the ginger pairing is rather fortuitous now. But lets face it, I had ginger wine in the house and that stuff is like alcoholic nectar of which I only put the fresh ginger in to enhance the booze! So…I’m not sure how overall healthy or medicinal the following dish is, but it is very satisfying to eat, and I even had some for breakfast the following day with cold custard. Not. Even. Guilty.

It’s at this point that I should also mention that I *think* I added some greengage plums to this dish, which was a totally amazing addition as the fruit really held shape and added a lovely bite to the overall dish. But I cannot of yet totally confirm this so I’ll have to come back to this post and edit it later if I ever find out whatever the hell plum-like things I actually did add to this.

Rhubarb filling for crumble:
400 g rhubarb - prepped weight
100 g greengage plums (possibly) - stoned and quartered
3 tbsp ginger wine - generous servings
1 tbsp fresh grated ginger with it's juices
100 g soft light brown sugar

Chop your rhubarb into long 10 cm by 1 cm sticks. Get all the above into a pot and simmer it all at low heat for around 15 minutes. You don’t want your rhubarb too soft. Once that’s done, you’ll probably have a bit too much thin liquid for a nice compote sauce, so sieve the fruit out and rest it in your oven proof dish while you crank the heat up in the pot and boil those fruit and sugar juices into a lovely thicker consistency. Pour this over your fruit and get your oven to 200°C. Move onto the crumble topping.

Crumble topping:
140 g self raising flour
85 g butter - chilled, cut in cubes
50 g soft light brown sugar
50 g walnuts - roughly chopped

With all of these ingredients in a glass bowl, you’ll want to dive in with your fingers and bring it together like course breadcrumbs. Don’t over mix and be too neat and tidy, the rougher the better. In fact. Go with *just* combined with larger odder shapes scattered through. The chopped walnut bits will help with this. Sprinkle this over your fruit mixture and whack it in the oven until the toppings golden brown and the fruit mix is bubbling to the surface a bit. 15-20 minutes maybe?

While that’s going on, lets make some actual proper custard too. This is Mary Berry’s recipe, and honestly, why would I want to change it? It’s pretty perfect. The only thing I did at the end was crank up the heat slightly and whisked it in a glass bowl before serving because I thought it was starting to split. Balloon whisks – kitchen lifesavers.

Mary Berry's "Real Proper Custard":
568 ml whole milk
55 ml single cream
1 vanilla pod - split lengthways
4 egg yolks
40 caster sugar
3 tsp cornflour - level measurements

Get a small pot on the stove and heat you milk, cream and vanilla pod at low heat. You don’t want it to boil.

In a separate bowl, mix up your egg yolks, sugar and cornflour until well blended.

Remove the vanilla pod (then wash and leave it to dry, put it in some sugar: vanilla sugar! Yay for Mary), and slowly pour the milk mixture into the egg yolk mixture – whisking all the time. Once it’s all incorporated, pour your custard back into your pot and slowly stir with a wooden spoon until you reach your desired consistency. Pour it all in a jug ready to serve and sit it in a pot of hot water to keep warm. Maybe put some cling film on top to stop a skin forming. Serve it up with your desert (or breakfast for that matter).

Scallops with Celeriac Purée & Lardons

scallops and celeriac purée

When the weather was cooler and I had a rather large celeriac root arrive in my veg box I decided to invite a friend over to cook up something nice with the celeriac and watch Black  Swan. Incidentally I recommend them both: The movie and the following dish.

Serves 2.

Scallops with Celeriac Purée & Lardons:
1 medium sized celeriac bulb
1 cup milk
Splash of single cream
50 g butter
100 g oak smoked lardons
12 scallops
Pinch of sea salt
Pinch of white pepper
Pinch of paprika
Some fresh basil to garnish

You’ll notice that I haven’t removed the orange part (or the coral) of the scallop. Puritans may suggest you do but I think they taste pretty good so at least try some before you discard it.

Peel and chop your celeriac bulb into small pieces. Get a medium saucepan on the stove at medium heat. To this add your chopped celeriac and cover with just enough milk. Bring it to a boil until it all softens up (around 10 minutes). When it’s nice and soft, season with salt and pepper and blend it all up with a hand blender. Add half the butter and the cream and simmer it down on low heat with a lid on until it reaches your desired thickness – or conversely, add more liquid until it reaches your desired thickness. Constantly taste and adjust your seasonings. Keep it warm and set it aside.

While that’s happening, cook up and render down your lardons in a small frying pan on medium high heat until nice and crispy. Add a pinch of paprika and maybe some cracked black pepper. When they are nice and crisp, keep a tablespoon or two of their fat for the scallops then set them aside in a slightly warm oven to keep warm. You’ll want to warm some serving plates too, so get those in there.

In a large non stick pan, get it up to medium to high heat. Add the reserved lardon fat and the rest of the butter. When the the fat starts to brown, add your scallops in a clockwise orderly fashion so you know which ones are taking in the most heat. Sear these for 30 seconds to 1 minute on one side and flip ’em over for 20 seconds or so. You may need to do you scallops in batches depending on how big your frying pan is.

Get your pre-warmed plates out and serve up. Purée in the centre of the plate, scallops on top. Sprinkle liberally with the lardons and their fat. Maybe a sprinkle of sea salt flakes. Basil to garnish.

Creme Caramel. Otherwise Known As: Caramel Flan V2

Creme CaramelSo a while ago as I was doing the New Year’s Detox I wrote about this mega easy caramel flan I made for my family over Christmas back in Hong Kong. It went down a treat, but for my Mother and myself it just wasn’t the soft delicious delight we were hoping for. Which made me try rather a lot of creme caramel recipes of late and I’ve been working on one that is not only soft and delicious, but doesn’t liquify upon turning out. It’s probably not *perfect* but it seems pretty fool-proof so far so I thought I’d share it. I made a massive one of these to finish off my Chinese New Year party (and probably my guests too), and I’ve also tried substituting the milk for not only rice milk, but soya as well, and I’m pleased to report that it works superbly.

Makes enough for 6-8 ramekins.

Caramel Flan V2:
115 g caster sugar
1 tbsp water
625 ml milk (or unsweetened dairy free substitute)
1 vanilla pod or 1 tbsp pure vanilla extract
100 g caster sugar
3 whole eggs
3 egg yolks

Oven at 170°C. Get a heavy bottomed non stick pan on to high heat. Into this add the 115 g of caster sugar and the tablespoon of water. Caramelise your sugar and be careful not to burn it, I like to just let it sit for ages taking in the heat while I work on other things. I’ll only start to stir with a metal spoon right at the end browning process.

While the caramel’s on the stove, put your ramekins in a deep enough tray to use as your water bath. But without any water in it for now, put it in the oven so your ramekins take on a good amount of heat. This is so when we spoon the caramel into them it doesn’t seize up.

Take your tray of hot ramekins out of the over when your caramel’s about done, then quickly and carefully spoon about a tablespoon of caramel into all the dishes. Move them about a bit to evenly coat. Set them aside.

In another pot, bring the milk and vanilla to just below boiling point. If you’re using a whole vanilla pod, don’t forget to slice along it length wise. When at heat remove from stove and set aside.

Get a large glass bowl and mix together all your eggs and the remaining sugar. To this use a fine mesh sieve and quickly whisk and incorporate the hot milk. When it’s all mixed together you may get a lot of foam on your custard mix. I like to place a kitchen towel on top to remove this.

Ladle some custard mix into each of the ramekins. Remove any extra bubbles with the kitchen towel as above. Place all the ramekins in the water bath tray and fill it with some boiled hot water so that it’s at least over the half way point of the ramekins. Now into the oven for 20-35 minutes.

The creme caramels should have some wobble in them still, but set. Some may have a solid skin atop of them. If you’re really fussy (I am) and the top membrane is thick enough, carefully remove this then let them cool and get them in the fridge ready to be served. The longer you leave them in the fridge the better I think because the caramel dissolves more. When you’re ready to serve, run a sharp knife all the way around and turn it out on a plate.

And that’s it! This also brings an end to all the dishes I made that snowy sunday evening to usher in the Year of the Snake. So I’ll be on to regular kitchen experiments from now on.CNY Flan

Pot Stickers – 鍋貼

Pot Stickers

Right! Here we go. The quintessential dumpling post that any Chinese person worth their salt needs to have up their sleeves.

These were made on the day of Chinese new year, and thank goodness for my friends helping to wrap! The meat and veg are easily interchangeable, be it pork, chicken or even lamb, with some sort of leafy cabbagey veg (pak choi, Chinese leaf, cabbage). I’ve gone for the absolute staple combo of pork and pak choi.

The wrapping technique I’ll be showing you here isn’t actually my preferred technique, but it’s your ‘this is what a dumpling looks like’ so it’ll be nice to start there before we advance to other styles right? I can actually make the wraps for this, but for the purposes of simplicity get yourself some wraps from your local Chinese supermarket. I’m also teaching you the Chinese style of pot stickers, not the Japanese ones. Which, to be fair is only really a difference in dumpling skin thickness. The nice thing about the Chinese thicker wraps is that they’re a bit more forgiving with the wrapping and can be boiled vigorously for a delicious water/soup variety of dumplings (水餃). The following makes around 30.

Pork and pak choi dumplings:
1 packet of thick dumpling skins (not the thin gyoza ones)
250g minced organic pork (not too lean)
100 - 150 g pak choi (baby ones better)
50 g spring onions (about half a bunch)
2 tbsp grated fresh ginger
1/4 tsp white pepper
2 tbsp light soy
1 tsp dark soy
3 tpsp sesame oil

Finely chop all your veg. Get everything (bar your dumpling skins obviously) into a mixing bowl and mix and squeeze everything with your hands. No messing about with a spoon or whatever. It’s quite hard to give you guys ‘proper’ veg weights as I like to eye ball my proportions. But basically you want a meat to veg ratio of around 60:40. The more veg the better I think, but you want there to be enough meat to bind it all together. Mix with your hands for around 5 minutes.

Ready to wrap? Get a shallow bowl of water and a tray dusted with rice flour ready. Let’s go:

How to fold pot stickers

1. Place a wrap flat on your hand.

2. Add about 1 tablespoon of mix in the centre.

3. Dip your finger into the water and make a ring all the way around the edge for your seal. Fold in half. Seal it and make sure there are no air bubbles.

4. Pleat!

5. Pleat-pleat-pleat-pleat. All done.

6. Take your dumpling by the pleats and gently press it onto your work top to form that flat base and curve it so it looks more crescent like. Yay! Dumplings.

So now that you’ve got all your dumplings, let’s turn them into delicious pot stickers. I hope you have a really decent non-stick frying pan with a lid, because you’ll need that lid to steam. The key to these is to NOT TOUCH THEM. I can’t emphasise that enough. Just trust that they are cooking okay? You can only move them when they are cooked and have a firm enough base to move. They aren’t called pot stickers for nothing.

Heat at medium high, frying pan on. When at heat, add a tablespoon of vegetable oil (corn or rapeseed good) and evenly coat the base. When the oil is nice and hot, add some dumplings. Space them out a bit they’ll expand, I also like to add them in a clockwise array just so I know which ones have been taking the heat longest. Now you’ll want to not touch these and let the bases take on a bit of colour, maybe 3-5 minutes? Now add enough water so that there’s a centimetre of liquid in the pan. Lid on. Heat up. Bring that liquid to a boil to create a load of steam. Steam for around five minutes.

At this point the water is evaporating out of the pan or you’ll need to take the lid off to evaporate the rest of the water away. Once the water is almost all evaporated, take a wooden chopstick or skewer and carefully run it around each dumpling to remove any access gloopy flour. Turn the heat down to medium high again (or even medium if that’s too scary) and get those bases crunchy. Another 2-5 minutes perhaps. At around this stage I like to give my pan a bit of a shake to loosen them up. Carefully lift to see what their colouring is like, you want nice and golden brown, not burnt. Keep frying them until they’re nice and crisp.

Serve up! I like having these with some Chinese black vinegar and freshly sliced ginger, but a huge jar of chilli is never too far away. If you have any spare, place them separately on a lightly floured tray in the freezer until solid. Then pack them all up in a bag. Nothing nicer than a lazy evening when you suddenly remember you have a few of these bad boys ready to go. If you’re cooking from frozen you can follow the above instructions, just have them on the first fry time a bit longer.

pot stickers cooking

Spinach & Prawn Wontons – 菠菜蝦雲吞

spinach and prawn wontonsOne of the traditional things to do on Chinese New Year is to gather together and wrap dumplings. I can see why because you wrap all the morsels faster and get to eat the fresh dumplings quicker, plus everyone gets to enjoy that feeling that they all had a hand in the meal. Fun times. Two types of dumplings were made at my CNY party, and my friend kindly managed the teaching and the wrapping of these on the night while I was manic in my mini kitchen with the other food. I believe her wrap technique was a form of Taiwanese fold, but I’ll be teaching you the Hong Kong folding style. Obvs.

The following filling makes around 28 wontons. Head to your local Chinese supermarket and get your mits on some wonton wraps. Yes. You can try to make these yourself, but one of the joys of nice wontons I find is the loose thin noodlely bits and I can guarantee that you won’t be able to roll the dough thinly enough. Just buy a packet already. There’s no shame in it.

Spinach and Prawn Wontons:
1 pack square wonton wraps
140 g raw prawns - deveined
225 g baby spinach leaves
2-3 garlic cloves - crushed
2-3 tbsp sesame oil
1/2 tsp sesame seeds
1 tsp cornflour
splash of light soy
pinch of fine salt
pinch of white pepper

Small frying pan on medium heat. Sesame oil in. When at heat, add your crushed garlic and fly until fragrant but not crispy. Set aside.

Get a pot of boiling water onto the stove and quickly blanch your spinach. When it’s wilted down strain the leaves and submerge in ice-cold water. Reserve the spinach water for some broth. Keep the leaves submerged while you deal with the prawns. Change the cold water every so often. This helps with getting rid of that metallic taste in your spinach.

With a pair of scissors over a mixing bowl cut up your prawns into half-inch bits. Add your pinch of salt then your corn four. Mix mix mix. Strain your spinach leaves and squeeze out all the liquid, you should end up with a couple of tennis ball-shaped spinach balls. With your scissors chop into these roughly and add the cut up bits of veg directly over your prawns. Finally add to this the garlic and sesame oil and the rest of the seasonings. You don’t want this mix too wet so easy on the soy, compensate with a bit more salt if you fancy. Mix thoroughly.

You’re now ready to wrap. The key to nice wontons is a lightness of touch and some finger dexterity, so hopefully these steps and my little photo How To will help. The only things I will emphasise is that these wraps are delicate and you don’t want to overfill them. You’ll need some flour dusted trays to stop the wontons from sticking and a small bowl of water to seal them.

Wonton How To Steps

1. Make a ring shape with your thumb and forefinger

2. Place a wrap on top of this

3. Add a teaspoon of mix to the centre and carefully press down

4. Using your finger dab a ring of water just around the mixture

5. Carefully pleat the corners over and lightly seal just around the top of the mix with length of your forefinger from your other hand.

6. Done! Try to avoid bunching/clumping the top frilly bits. You’ll want these lovely and loose in your broth.

When you want to cook these, get a pot of water to boil. When boiling use a slotted spoon to agitate the water and carefully drop the wontons in. Keep carefully agitating, this stops them from sticking to the bottom of the pot. When the water comes back to the boil and the wontons float to the surface you’re ready to dish them up.

I served mine with a broth made with some reserved spinach water, with splashes of soy and fish sauce. Add to this some fresh dill, coriander, chilli and thinly sliced ginger.

Oh! If you want to save these they won’t keep in the fridge so you’ll have to freeze them, set them apart on a tray and place them in the freezer, once solid collect them all and pop them into a freezer bag. Cook them in boiling water from frozen later. My kinda fast food.

Categories