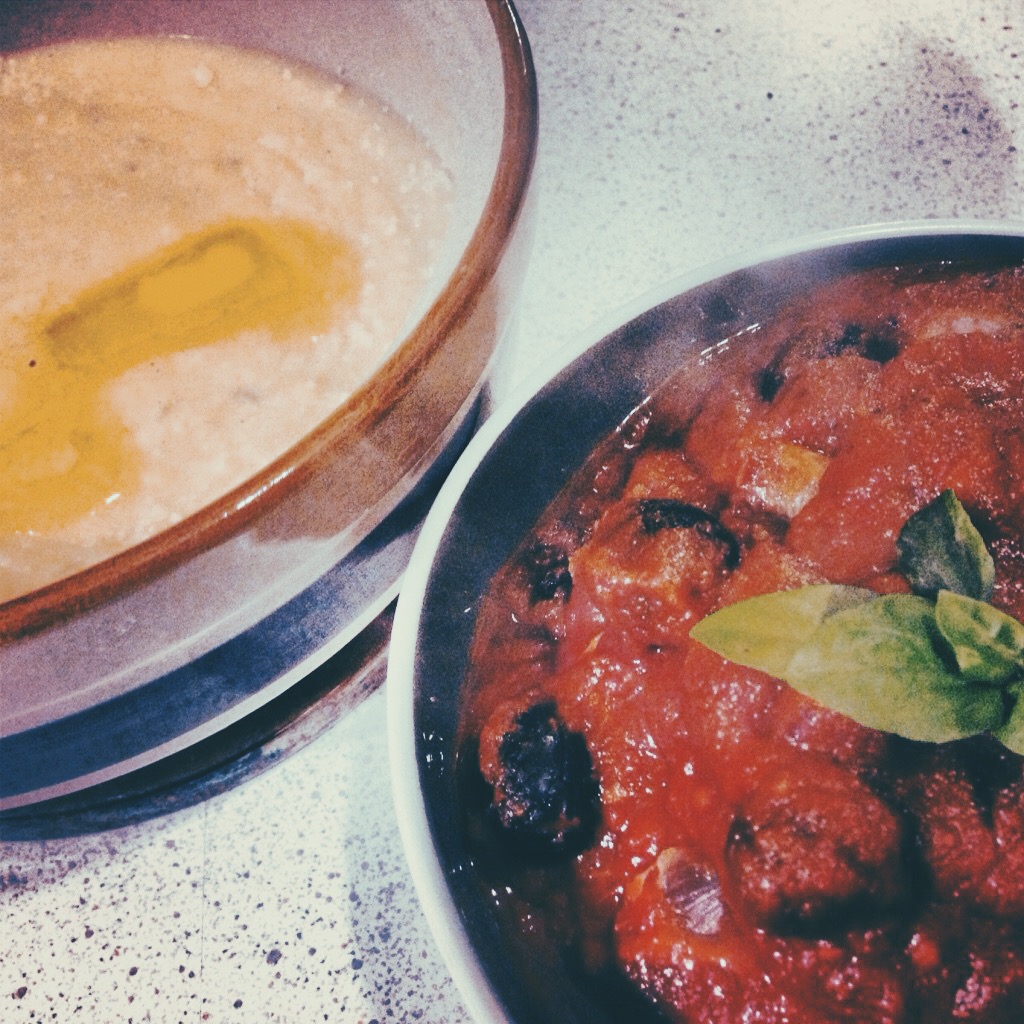
Roast Duck Ragu with Polenta

duck and polentaI had a friend over for dinner. It was sort of a long overdue dinner offering that happened to also coincide with me finishing a bunch of DIY in my mini kitchen. It was a delicious little feast, and for the first time in ages, I cooked meat. So here it is, the first official meaty post in my nascent food blog.

The tomato sauce base of this has already been posted so you’ll want to make a batch of that tasty goodness. This will feed two.

Duck Ragu Ingredients:
150 g cherry tomatoes - halved
Flaky sea salt and black pepper
Extra virgin olive oil
2 good sized duck legs
750 ml tomato sauce
Handful of good black olives - stoned
Small handful of chopped parsley to serve

Oven to 180°C. On a lined baking tray: season your halved cherry tomatoes, splash ’em a bit with some olive oil and roast them for about half an hour until they blister and practically collapse. Remove and set aside.

Now get your oven to 240°C. Take your duck legs and season them with some salt and pepper. Roast them on until the skin is lovely and crispy (10-15 mins, maybe). When all crispy, lower that oven’s temperature to 200°C and roast these bad boys for about an hour until they’re tender. When done, set them aside and save the cooking juices and meat drippings for later.

When the duck is cool enough to handle. Remove the skin (and eat it! Haha, that’s what we did) and pick off the meat. Roughly chop the larger bits so you get nice sized bits of meat. Set aside.

Get a large pot on the stove and at medium heat, now heat up your tomato sauce. Add olives, some black pepper and all the dripping and cooking juices from the duck. Bring the sauce to a simmer for 30 minutes or thereabouts until it is very thick. Ragu gloopy thick. Add the duck legs and cook this for a further 10 minutes. Just before you’re about to serve your ragu, stir in the roasted tomatoes and toss in some chopped parsley.

I served this with soft polenta. I am always making up my polenta to taste and by eye. But this is kinda what you need:

Soft Polenta Ingredients:
Water
Polenta flour
Some sort of cheese - I went parmesan
Salt & Pepper
Unsalted butter

In a heavy bottomed pan, get some water to a boil. You’ll want to think of proportions of food to serving amounts I suppose. So a cup and a half of water per person. Get a whisk and vigorously whisk that water in one direction only, this stops the polenta from getting lumpy. Now carefully add your polenta flour a handful at a time while whisking. This stuff cooks and expands fast, and before you know it, you’re polenta’s too thick and you’ll need to add more water and end up with way too much polenta (which isn’t a bad thing, pour leftovers into trays and griddle the firmer polenta cakes the next day…I bloody love polenta)…anyway, one handful at a time. When it’s at the consistency that you like, add a load of cheese in to taste and season. Serve up with a blob of unsalted butter.

I also served the ragu with a side of griddled asparagus. You really don’t need to do much with these. Bend and snap off the chewy parts of the asparagus spears. Hot griddle pan. Splash of olive oil. Griddle them. Serve with sea salt and freshly squeezed lemon. You can serve these with shavings of parmesan as well, but with all the cheese in the polenta, I didn’t want to over parmesan the dishes out.

grilled asparagus

Seafood, Fennel and Lime Salad

This is a straight up Ottolenghi recipe that I’ve followed almost to the letter. More herbs more lime more prawns. But it’s *basically* to the letter. It’s not often I follow a recipe so closely, but it’s so reliant on fresh flavours that you really can’t go wrong. I cooked this for a friend recently and had to buy clean and prepare baby squid for the first time. Exciting stuff. I’ve adjusted it so it’s a starter that feeds 2. Oh! And before I go into a bit of a rant. Get proper big and raw tiger prawns. And by tiger prawns, I mean proper prawns, not pre cooked tiny little shrimps. There is a big difference between prawns and shrimp. The end.

Seafood, Fennel and Lime Salad:
1 small fennel bulb - thinly sliced
1/2 a small red onion - thinly sliced
Juice and zest of 1 lime
1 garlic clove - crushed
1 tbsp fresh dill - chopped
1 tbsp fresh flat leaf parsley - chopped
1 mild chilli - de-seeded and finely chopped
2 tbsp olive oil
6 tiger prawns, peeled and de-veined
170 g cleaned baby squid
1 tbsp sumac
2 tbsp chopped coriander
Sea salt
Pomegranate seeds to garnish

Top and tail the fennel and slice it widthwise super thinly through a mandolin into a large bowl. Thinly slice your red onion and toss them in. Whack in the lime zest, juice, garlic, parsley, chilli, one tablespoon of olive oil and a good pinch of salt. Mix it all up. Set aside.

Get a griddle pan on the stove and get it smoking hot. Mix the prawns and squid in a bowl with the other tablespoon of oil and a pitch of salt. Grill these in small batches and turn them over once. The squid should take 1-2 mins each side and the prawns 2-3 mins. You want the nice grill lines so don’t move them around in the pan.

Once they’re done, slice up the squid and toss the seafood in with your salad. You can serve this warm or a leave it in the fridge for up to 1 day. When serving, sprinkle over your sumac and coriander, taste, adjust seasoning, maybe squeeze more lime, and liberally garnish with the pomegranate seeds. EAT.

Incidentally, cleaning squid is quite fun. Carefully pull out the tentacles. Chop off the eyes and beak. Remove the flat soft bone from the hood(?) and rinse out any bits inside that. I found sacks of eggs in a couple of mine. This made me fleetingly sad for a moment, before I remembered how tasty grilled squid was.

squid prep

Mini Caprese Stacks

I made these recently as part of a four course meal. Look! It’s a Caprese salad in bite sized form! Not only are they super easy to make, but they’re also perfect little morsels to kick start a meal. Antipasto. You clever Italians you. The only thing you need to get right for this is amazing ingredients, so go for the best tomatoes and cheese you can get your grubby little mitts on. I went with piccolos and an organic mozzarella.

Mini Caprese Stacks:
Cherry tomatoes
Mozzarella
Fresh basil leaves
Extra virgin olive oil
sea salt
black pepper

Carefully shave the top and tail of each cherry tomato before you halve them, this gives them a flat base to sit on so they stand properly. Trim the stem off the end of each basil leaf. Arrange your tomatoes on a plate, add a leaf, rip a bit of cheese. Leaf. Cheese. Leaf. Cheese. Leaf. Cheese. Drizzle with a bit of oil. Bit of salt and black pepper. Done.

Basic Tomato Sauce

I go to Polpo. A lot. I like the chilled atmosphere and nice little martini bar downstairs. I love their little sharable dishes and tiny tumblers to drink wine and espressos out of…but mostly I like the small proportions because I get to eat more things. Anyway, they have a cookbook now and as well as giving away their secrets, it’s beautifully bound, filled with great pics and is fun to read. They have a good Basic Tomato Sauce recipe in it. Do you by a bottle of tomato sauce for your pasta? Why do you do that? This is much, much nicer. I’ve reduced the final amount, added booze, and more spices to this. But that’s what a good basic recipe should be: adaptable. Make this on a lazy Sunday and enjoy it throughout the week. Makes just under a litre.

Basic Tomato Sauce:
2 tbsp extra virgin olive oil
1/2 onion - finely chopped
1 garlic clove - crushed
1/2 tbsp salt - scant
A good cracking of black pepper
1 small red chilli - deseeded and finely chopped
A pinch of chilli flakes
375g fresh tomatoes - really ripe and sweet
1.5 tins/cartons of crushed  tomato - about 600g
1 small handful of oregano - fresh or 1 tbsp dried
1 bay leaf
A good glug of red wine
A bit of sugar - if you want, I didn't add this

Sauce pan on stove at medium heat. Add 1 tablespoon of oil. When at heat add your garlic, onion, chilli (fresh and dried), bay leaf, black pepper and dried oregano if you’re not using fresh. Stir and sweat ’em out. When the onions are glossy and translucent, get your fresh tomatoes in with the other tablespoon of oil. Cook for 15 mins.

Now add the crushed tomatoes and glug that wine in. Reduce the heat to a gentle simmer, lid on, leave for an hour. In the final moments, if you’re using fresh oregano (I mean, how hard is this stuff to find? Grow some in a kitchen pot for a constant supply), roughly chop it up and stir it all in. Taste. Adjust seasoning. Add a bit of sugar if your tomatoes aren’t sweet enough.

Pan off heat. Transfer into a blender or use a stick blender to whiz it all up. Done! You can strain this mixture further and add a bit more water to make a pasata if you fancy it.

Chinese Styled Pumpkin Stew with Kale and Mince

As the title suggests, this is a Chinese stew type dish which really reminds me of wintertime in Hong Kong. And after these past few cold rainy days, I really needed some HK styled comfort food. The type that has gloriously squidgy textures and an oyster saucy gravy that goes divinely with plain steamed rice. This is rather hilariously made with posh versions of all the 3 main ingredients of pumpkin, carrots and kale (Casperita squash, purple carrots and cavolo nero), obviously you can substitute with the more easily found versions in your grocery isle. I’ve also used Quorn mince instead of proper meat mince, if you would like to use real meat, go for pork mince. Failing that, turkey or chicken.

Chinese Pumpkin Stew:
1 small squash or pumpkin (Cantaloupe melon sized?)
1 carrot - chopped
2 generous handfuls of kale - shredded
2 cloves garlic - slightly smashed
4-6 shallots - quartered
1 tbsp veg oil
250 g mince
1/2 cup water
1-2 tbsp oyster sauce
1/2 tbsp chilli bean paste
2 cardamom pods - lightly smashed
1 whole star anise
1/4 tsp ground cinnamon
1/4 tsp white pepper
salt to taste
1 tsp cornflour (optional)

Oven to 170°C. Chop up your squash and cut it into smallish chunks, I left the skin on because I like the extra texture after roasting, toss them in a bowl with a bit of oil, white pepper and some salt. This is probably where the recipe isn’t strictly Chinese as not everyone has an oven back home, but I really like the slight crisping of the edges roasting provides. Roast until tender about 30-40 minutes.

While that’s roasting. Pan on the stove. Medium-high heat. Heat the oil then sauté the garlic and shallots until slightly tender. Add your smashed cardamom pod, star anise and cinnamon and fry to release some nice smells. Now add your mince and brown a bit. Carrots, the 1/2 cup of water, oyster sauce and the chill bean paste go in next. Cover and cook until the carrots are tender. The kale goes in last for a couple of minutes. Taste and adjust seasoning.

The optional cornflour should be used to thicken the sauce at this point. In a small bowl, mix thoroughly with a tablespoon of cold water and add it to the pan and stir in well. Be careful! Too thick and it becomes horrible Chinese takeaway gloopy – and nobody needs that. Stir through your pumpkin and serve up. There should be enough to feed two. Or, one very hungry small person…

Thanksgiving Potluck: Pumpkin Pie

Last year, a friend of mine decided to host a Thanksgiving dinner. But as the task was a bit vast a pot luck dinner was agreed where each guest would focus on one element of the meal. It was a great success. This year Thanksgiving Potluck was had again, and it’s looking like a pretty nice tradition being established. Good food, good friends, and a moment to be thankful for the past year.

Last Thanksgiving I made a pumpkin pie. It was latticed, yummy but too massive for a comfortable after dinner treat. So this year, I used a different recipe and tried to focus on dainty.

The first thing you want to do is make the pie crust:

Basic Pie Crust:
260 g plain flour
1/2 tsp salt
110 g unsalted butter
a 23 cm pie dish - greased
baking beans

Flour, salt and butter in an electric mixer with a paddle attachment. Beat at a low speed until they’re all combined and  you get a sandy consistency. Add a tablespoon of water and start to increase the mixing speed. When well mixed, add another tablespoon of water. You want to get a smooth even dough, but you don’t want to add too much water. It’s better to be patient and wait while that paddle it going round super quick to bring that dough together. Wrap in cling film. Rest in the fridge for at least an hour.

Oven to 170°C.

Lightly flour a work surface and roll that dough out and line your pie dish. Put some greaseproof paper on and fill with those baking beans. Partially blind bake this for 10 minutes. It should be a bit raw still. Keep that oven at 170°C and make that pie filling.

Pumpkin Pie:
1 egg
425 g tinned pumpkin puree
235 ml evaporated milk
220 g caster sugar
1/4 tsp ground cloves
1 tsp salt
3/4 tsp ground cinnamon
1/4 tsp ground ginger
1 tbsp plain flour

In a large enough bowl, thoroughly mix up all these ingredients and pour them through a sieve into you’re slightly raw pie crust. I know, I know. I’m using tinned pumpkin puree…oooh…contentious. But you know what? I actually think it tastes nicer than prepping all that pumpkin myself. I usually like doing everything from scratch, but you get less of that green/fresh vegetable taste and I’m not keen on that in my desserts. Bake for  30-40 minutes, or until the filling has set and has lost that wobble when you shake it. Serve it with some ice cream or cream. Hope you all had a happy Thanksgiving.

Orange Infused Braised Fennel

Some fennel arrived in my veg box this week, and I was left in a bit of a quandary. Since the Queen’s Jubilee celebrations this year, where I suffered a particularly bad Sambuca related incident, I have been unable to come within 10 feet of the stuff without gagging and likewise with anything resembling the aniseed tipple. Cue the mild consternation at my veg box opening. Can I even prepare the veg without feeling nauseous? How would I serve the fennel without strange Queeny related flashbacks?  The answer is braised. Braised in an orangy saucy gravy.

The original recipe actually required Sambuca, Pastise, Ouzo or any other aniseed flavored booze. Um. I really had to substitute this for Cointreau, and I would highly recommend any fellow Sambuca Sufferers to follow suit.

Braised Fennel Ingredients:
1 large fennel bulb
1 tbsp butter
1/2 tsp salt
1/2 tsp sugar
1 tbsp Cointreau
1/4 cup veg stock
1/4 cup water
1 tbsp fennel fronds
Zest of half an orange
1 tbsp orange juice

Trim the top off your fennel bulb, remove the fronds and lightly chop them up and set aside. You want to divide your bulb into 8, pieces. Keep them attached to the core so they don’t fall apart when you’re cooking.

Set a wide enough sauté pan on the hob where you’ll be able to brown each piece of fennel in one layer. Set it to medium high heat and melt your butter. Bring the heat down a bit and lay all you fennel bits in. Nicely brown one side. This should take around 4 mins. Sprinkle over the salt and sugar for caramelization. Turn to brown the other side.

Once evenly browned. Increase the heat and add your alcohol. This should quickly boil down. When it’s almost entirely evaporated, add the stock and water. Once this liquid starts boiling, bring the heat down low. Cover the pan and simmer for about 15 minutes. While this is simmering grate your orange zest – set aside.

15 minutes up? Remove that lid and let the sauce boil down to a glaze. Add a pinch of the fronds and the half the zest. Gently combine.

Plate up. Brush the saucy gravy goodness on the fennel. Sprinkle with the rest of the fronds and zest. Squeeze over with the orange. Done.

I can report that I ate the lot. It’s delicious. I even managed to share some with a friend with similar aniseed aversions and they didn’t gag either. So, a win in my books methinks.

Xavi’s Cookie Monster Cake

My fellow Eurasian friend Xavier is leaving the UK to try out Hong Kong for a bit. As I grew up in Hong Kong and chose to come over to Blighty, it’s the inverse move I made – so all in all: Exciting times for Xavi. When I offered to make a cake for his leaving do held at one of my fav Vietnamese places on Kingsland Road,  Song Que, I got this response:

“I don’t care what flavour cake you make… …So long as it looks like Cookie Monster”

Interesting brief.

I’ve never made a novelty cake before. I knew I’d have to make an awful lot of icing to make that furry looking decoration. I was initially contemplating colouring desiccated coconut blue and slathering it on a pre-iced blue cake. But the thought of how much desiccated coconut I would need or how I would even get the two blue elements the same shade was driving me a bit potty so I opted for the icing technique – because no one needs a blue cakey melt down. I didn’t want to send all the guests into an instantaneous diabetic coma so I went for a more neutrally flavoured cake of banana, pineapple with walnuts and cashews. The following will make a 3 layered sponge cake with 20cm cake tins and a shed load of frosting.

Ingredients for Cookie Monster Cake:
300 g caster sugar
3 eggs
300 ml sunflower oil
270 g banana peeled, roughly chopped
1 tsp cinnamon
300 g plain flour
1 tsp bicarbonate of soda
1/2 tsp teaspoon vanilla extract
100 g tinned pineapple, chopped into small pieces
100 g walnuts and cashews - I went with a 70:30 split

Oven to 170°C. Roughly chop the nuts and pineapple, set aside. With your electric or stand mixer: incorporate the sugar, eggs, oil, banana, vanilla and cinnamon at medium speed.

In a separate bowl, mix the flour and bi-carb. Add this to your wet mixture bit by bit until even. Finally stir in the pineapple and nuts with a wooden spoon.

Smear your cake tins with butter and line the bottom with parchment. Evenly pour in your mixture between the three tins and bake for 20-30 minutes. Mine took a bit longer so check with a skewer when they are looking golden brown on the top. Once the skewer comes out clean, take them out and leave them to cool in their pans while you sort out the icing.

Icing & Decoration:
900 g icing sugar
375 g cream cheese
150 g unsalted butter
1 bottle of blue food colouring
Black food colouring
A couple of chocolate chip cookies

You’re meant to mix the butter and icing sugar first before you add the cream cheese, then mix it all at medium to high speed for 5 minutes. I just whacked all three into my stand mixer and it turned out okay. But I really must recommend you roughly make a teepee with a tea towel because icing sugar really goes everywhere, especially at these huge quantities.

Before you add your food colouring prepare your cake. Slice the rounded top off your base layer (keep these tops for later). Blob a bit of icing onto your plate or whatever you’ll be serving the cake on. Stick base layer on said blob. Get your palette knife and spread some of your plain cream cheese frosting on top of your base layer. Cut the dome off your middle layer. Place on your base layer. Frost top. Place your final cake layer on top, I didn’t slice the top off this as I thought the rounded dome helped with the face shape.

Remove 2-3 tablespoons of the frosting and mix in some black colouring for the mouth. Using a mixer again, you can now add the blue colouring to the rest of your frosting to make your desired blue colour.

Googly Eyes:
Some of your cut off cake tops
Tennis ball sized amount of natural marzipan
2 large chocolate buttons
2 tsp Black food colouring

Make those eyes! With the cut off sponge tops, use a small cup or egg cup to trace around and cut a couple of circular pieces of sponge with a knife. Roll out your marzipan to 5mm, cut two large circles out and wrap each round a sponge disk. Coat the tops of  your chocolate buttons with black food colouring. Let these dry before fixing them on to the marzipan with a bit of frosting (I didn’t let them dry enough as I was running a bit late – error).

Use a palette knife and spread a thin but even coat of blue frosting around your whole cake. Affix those big marzipan eyes onto the top of the cake. Pipe out your black mouth shape. Fit a clean piping bag with a star nozzle, fill it with the blue icing. Pipe. Pipe. Pipe. Furry muppet monster! Shove the cookies into his mouth. You’re ready to go.

By the time it came to eat and cut the cake, Cookie Monster’s eyes were melting…causing him to cry black deathly tears as I ruthless carved into his face with a novelty cake knife that serenaded out tinny versions of Happy Birthday and the Wedding March. Outstanding.

Bon Voyage, Xavi. I hope you fall in love with Hong Kong, 一路順風!

Glut of Cucumbers: Simple Asian Cucumber Salad

I’ve been getting a lot of cucumbers in my veg boxes as of late, and I was simply not getting through them enough. So at times like these I really love to make this simple Asian salady side dish. There’s a lot of variations of these dishes across the swathe of Asia and the only reason I’m not calling strictly calling this a Chinese pickle recipe is because I’ve not added any rice vinegar (but it is cured with the salt). Serving cucumbers in this fashion is most like Korean namul and it’s those variations of veggie sides that I love most about Korean BBQ’s.

Simple Cucumber Namul Ingredients:
1 whole cucumber or 2-3 smaller varieties
1 tsp salt
1/2 tsp chilli flakes or 1 small red chilli
1/4 tsp white pepper
1-2 tbsp sesame oil
1-2 spring onion finely chopped (optional)
1/2 tsp sesame seeds (optional)

You want to slice the cucumber into long strips at around 2-3 mm thick. I used to do this by hand with a filleting knife, but my cousin and his wife bought me a voucher for a cooking store last year and I got a mandolin…man…I’m loving the mandolin. When you’ve got lovely long thin strips, cut away the cucumber seed areas. Yes, I know you can eat these, but for the purpose of this dish they add way too much water, so get rid.

In a sealable container add all the above ingredients and mix until all evenly coated. You might think that there’s just a bit too much salt in this, but the salt helps draw out the water from the cucumber giving them a nicer bite (and that water will eventually dilute the salty flavours anyway). Now put them in the fridge overnight and enjoy the next day.

This recipe is pretty adaptable to your tastes, you can even add a bit of soy, grated ginger or garlic if you would like. The veg is really interchangeable: cabbage, carrots, beans, bean spouts, radish, kohlrabi…some of these veg you’ll want to par boil. I’ve served my cucumbers with a congee made with rolled oats – a healthier version of congee perhaps, but mostly because I didn’t plan to cook the rice early enough for making nice creamy congee.

Salsify: The Poor Man’s Oyster?

There was a very interesting addition in my veg box recently. Wrapped carefully in brown paper were what looked like four 10 inch branches of a tree covered in a layer of dried mud. “…” I thought, as I washed them clean and guessed at burdock. Only to discover (after ferreting out my receipt) that I’d actually received some salsify. I have never eaten salsify before although I vaguely remember reading some recipe recommending making chips out of them. How boring.

A quick search on the inter webs today informed me that the salsify root is also known as the ‘oyster plant’ as it tastes a bit like those delicious morsels of the sea. I absolutely adore oysters and after peeling a bit of root and tasting it raw and then quickly blanching and tasting another piece, I can report that these oyster allusions are pure: lies. What it does taste like however, is a cross between lotus root, water chestnuts and coconut flesh. Which instantly made me think of my Aunty Ann’s lotus root fritters and that I really must learn how to make next time I’m back in Hong Kong…anyway. Fritters. Salsify fritters. Let’s go:

Salsify Fritter Ingredients:
Approx. 300 g salsify cleaned of mud - pre peeled weight
2 tbsp unsalted butter
1 garlic clove - crushed
1 tbsp minced lemon grass
1 tbsp paprika
1/2 tsp chilli flakes (or one small red chilli - diced)
3 tbsp coriander - roughly chopped (save some to garnish)
1 egg - lightly beaten
1 tbsp flour
Sea salt & ground black pepper
2 tbsp olive oil

Peel and coarsely grate your salsify, once those roots become too fragile to peel, chop them up to match the grated bits. Add a tablespoon of butter into a frying pan at medium heat and sauté the salsify until tender. Transfer into a bowl and mix well with the garlic, lemongrass, chilli, paprika, coriander, egg and flour. Basically mix every except the butter and olive oil. Generously season with the salt and pepper.

Frying pan back on the stove at medium heat and put the remaining tablespoon of butter in with the olive oil. This helps your butter reach a higher heating point without it burning.

Get a tray, coat it with some flour. Dust your hands in that flour and quickly form a fritter with your dusty hands – once moulded rest it in the flour tray. Dust. Form. Dust. Form. You should make around 5-6 fritters.

When the oil and butter mixture is hot enough to sizzle. Fry the fritters until golden brown on each side. About 5 minutes each. When done, place them on a paper towel to drain them.

Serve up and garnish with some extra coriander leaves. I served these tasty fritters with poached egg, a slice of lime, and an easy salad of romaine lettuce, cucumber and tomatoes. The salad was dressed with an Asian dressing made up of sesame oil, rice vinegar, light soy and a mix of sesame seeds. I quickly made this to taste…but if I were to guess my proportions I’d say 1 tbsp of each liquid with 1 tsp of the seeds. Squeeze that lime over your fritters and consume!

Categories