Panna Cotta with Blackberry Compote

panna cotta

Wow, a week has passed and I haven’t updated. My bad. It’s not that I wasn’t cooking, truth be told, I’m actually back in Hong Kong over the holidays and there’s a lot of cooking, eating and catch ups to be had. But this post isn’t about my blogging tardiness, it’s about this delectable panna cotta I made as the finishing touch to a meal I cooked for my friend. Deserts are always I bit of a hard one I find. I tend to always eat a bit of fruit normally, but after an indulgent meal sometimes you crave something a little more. This is a dainty light panna cotta with a sweet yet satisfyingly sharp compote to balance out those flavours. I’ve cheated a bit, in that the panna cotta isn’t set then turned out of a ramekin, but how pretty does this look? Plus, Polpo does it this way, so it can’t be all bad. This makes 3-4 little tumblers worth of pudding.

Panna Cotta with Blackberry Compote:
190 ml full fat milk
200 ml double cream
40 g caster sugar
1 vanilla pod
4 g leaf gelatin
1 tbsp of grappa or grape juice
About 125 g of blackberries with extra to serve

Put a heavy based pan onto the stove. Into this, add your milk, double cream,  35 g of caster sugar and the seeds scraped out of your vanilla pod. Just before it all comes to boiling point, remove it from the heat.

Get some icy water into a container and soften your gelatine leaves for about 5 minutes. Squeeze out the water (playing with gelatine at this stage is quite tactile and fun!) and add this to your creamy mixture along with your grappa.

Pour your creamy liquid into a glass bowl over some ice and let it slowly cool. Give it a stir every so often to disperse the vanilla pod seeds. Once the seeds start to suspend themselves in the creaminess, about an hour later, your mixture is ready. Decant into some tumblers and chill them in the fridge. They are even better if left overnight, but I was happy with 8 hours of chilling.

Now make your compote. Put your 125 g worth of blackberries into a large saucepan with around 25 ml of water and the remaining caster sugar. On a very low heat, poach those berries until they soften and start to lose their shape. At this point you want to access how you like your compote. I mashed half of the softened berries and added a tiny bit more sugar and water. I would recommend that you don’t make it too sweet though, because you want something to counter the sweet creaminess of the panna cotta. But you know. Do it to taste.

When you are ready to serve, add a generous helping of compote to your little panna cotta tumblers and add a couple of fresh blackberries for some variation. Yum yum yum. Oh! It’s new year’s eve today as well so I hope you all have a blast partying around the world tonight. Bring on 2013!

Roast Duck Ragu with Polenta

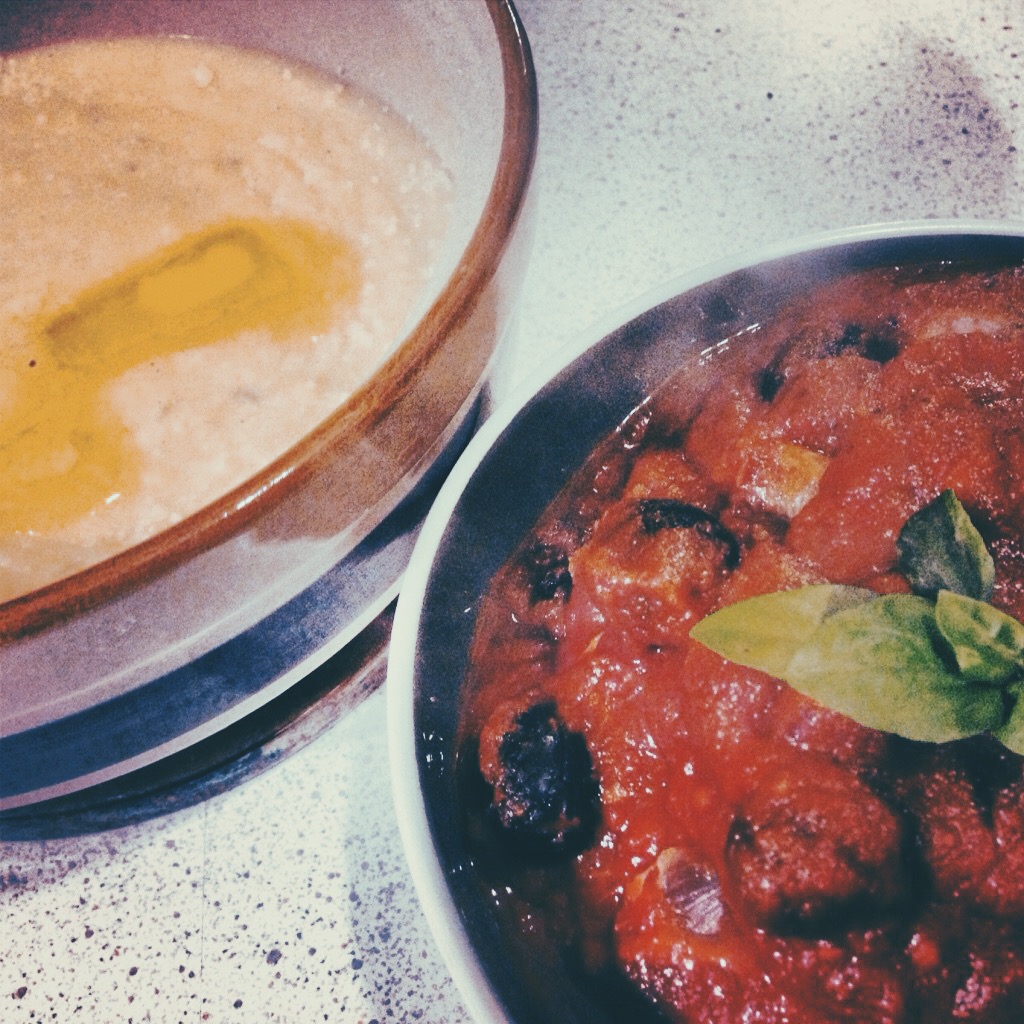
duck and polentaI had a friend over for dinner. It was sort of a long overdue dinner offering that happened to also coincide with me finishing a bunch of DIY in my mini kitchen. It was a delicious little feast, and for the first time in ages, I cooked meat. So here it is, the first official meaty post in my nascent food blog.

The tomato sauce base of this has already been posted so you’ll want to make a batch of that tasty goodness. This will feed two.

Duck Ragu Ingredients:
150 g cherry tomatoes - halved
Flaky sea salt and black pepper
Extra virgin olive oil
2 good sized duck legs
750 ml tomato sauce
Handful of good black olives - stoned
Small handful of chopped parsley to serve

Oven to 180°C. On a lined baking tray: season your halved cherry tomatoes, splash ’em a bit with some olive oil and roast them for about half an hour until they blister and practically collapse. Remove and set aside.

Now get your oven to 240°C. Take your duck legs and season them with some salt and pepper. Roast them on until the skin is lovely and crispy (10-15 mins, maybe). When all crispy, lower that oven’s temperature to 200°C and roast these bad boys for about an hour until they’re tender. When done, set them aside and save the cooking juices and meat drippings for later.

When the duck is cool enough to handle. Remove the skin (and eat it! Haha, that’s what we did) and pick off the meat. Roughly chop the larger bits so you get nice sized bits of meat. Set aside.

Get a large pot on the stove and at medium heat, now heat up your tomato sauce. Add olives, some black pepper and all the dripping and cooking juices from the duck. Bring the sauce to a simmer for 30 minutes or thereabouts until it is very thick. Ragu gloopy thick. Add the duck legs and cook this for a further 10 minutes. Just before you’re about to serve your ragu, stir in the roasted tomatoes and toss in some chopped parsley.

I served this with soft polenta. I am always making up my polenta to taste and by eye. But this is kinda what you need:

Soft Polenta Ingredients:
Water
Polenta flour
Some sort of cheese - I went parmesan
Salt & Pepper
Unsalted butter

In a heavy bottomed pan, get some water to a boil. You’ll want to think of proportions of food to serving amounts I suppose. So a cup and a half of water per person. Get a whisk and vigorously whisk that water in one direction only, this stops the polenta from getting lumpy. Now carefully add your polenta flour a handful at a time while whisking. This stuff cooks and expands fast, and before you know it, you’re polenta’s too thick and you’ll need to add more water and end up with way too much polenta (which isn’t a bad thing, pour leftovers into trays and griddle the firmer polenta cakes the next day…I bloody love polenta)…anyway, one handful at a time. When it’s at the consistency that you like, add a load of cheese in to taste and season. Serve up with a blob of unsalted butter.

I also served the ragu with a side of griddled asparagus. You really don’t need to do much with these. Bend and snap off the chewy parts of the asparagus spears. Hot griddle pan. Splash of olive oil. Griddle them. Serve with sea salt and freshly squeezed lemon. You can serve these with shavings of parmesan as well, but with all the cheese in the polenta, I didn’t want to over parmesan the dishes out.

grilled asparagus

Seafood, Fennel and Lime Salad

This is a straight up Ottolenghi recipe that I’ve followed almost to the letter. More herbs more lime more prawns. But it’s *basically* to the letter. It’s not often I follow a recipe so closely, but it’s so reliant on fresh flavours that you really can’t go wrong. I cooked this for a friend recently and had to buy clean and prepare baby squid for the first time. Exciting stuff. I’ve adjusted it so it’s a starter that feeds 2. Oh! And before I go into a bit of a rant. Get proper big and raw tiger prawns. And by tiger prawns, I mean proper prawns, not pre cooked tiny little shrimps. There is a big difference between prawns and shrimp. The end.

Seafood, Fennel and Lime Salad:
1 small fennel bulb - thinly sliced
1/2 a small red onion - thinly sliced
Juice and zest of 1 lime
1 garlic clove - crushed
1 tbsp fresh dill - chopped
1 tbsp fresh flat leaf parsley - chopped
1 mild chilli - de-seeded and finely chopped
2 tbsp olive oil
6 tiger prawns, peeled and de-veined
170 g cleaned baby squid
1 tbsp sumac
2 tbsp chopped coriander
Sea salt
Pomegranate seeds to garnish

Top and tail the fennel and slice it widthwise super thinly through a mandolin into a large bowl. Thinly slice your red onion and toss them in. Whack in the lime zest, juice, garlic, parsley, chilli, one tablespoon of olive oil and a good pinch of salt. Mix it all up. Set aside.

Get a griddle pan on the stove and get it smoking hot. Mix the prawns and squid in a bowl with the other tablespoon of oil and a pitch of salt. Grill these in small batches and turn them over once. The squid should take 1-2 mins each side and the prawns 2-3 mins. You want the nice grill lines so don’t move them around in the pan.

Once they’re done, slice up the squid and toss the seafood in with your salad. You can serve this warm or a leave it in the fridge for up to 1 day. When serving, sprinkle over your sumac and coriander, taste, adjust seasoning, maybe squeeze more lime, and liberally garnish with the pomegranate seeds. EAT.

Incidentally, cleaning squid is quite fun. Carefully pull out the tentacles. Chop off the eyes and beak. Remove the flat soft bone from the hood(?) and rinse out any bits inside that. I found sacks of eggs in a couple of mine. This made me fleetingly sad for a moment, before I remembered how tasty grilled squid was.

squid prep

Mini Caprese Stacks

I made these recently as part of a four course meal. Look! It’s a Caprese salad in bite sized form! Not only are they super easy to make, but they’re also perfect little morsels to kick start a meal. Antipasto. You clever Italians you. The only thing you need to get right for this is amazing ingredients, so go for the best tomatoes and cheese you can get your grubby little mitts on. I went with piccolos and an organic mozzarella.

Mini Caprese Stacks:
Cherry tomatoes
Mozzarella
Fresh basil leaves
Extra virgin olive oil
sea salt
black pepper

Carefully shave the top and tail of each cherry tomato before you halve them, this gives them a flat base to sit on so they stand properly. Trim the stem off the end of each basil leaf. Arrange your tomatoes on a plate, add a leaf, rip a bit of cheese. Leaf. Cheese. Leaf. Cheese. Leaf. Cheese. Drizzle with a bit of oil. Bit of salt and black pepper. Done.

Basic Tomato Sauce

I go to Polpo. A lot. I like the chilled atmosphere and nice little martini bar downstairs. I love their little sharable dishes and tiny tumblers to drink wine and espressos out of…but mostly I like the small proportions because I get to eat more things. Anyway, they have a cookbook now and as well as giving away their secrets, it’s beautifully bound, filled with great pics and is fun to read. They have a good Basic Tomato Sauce recipe in it. Do you by a bottle of tomato sauce for your pasta? Why do you do that? This is much, much nicer. I’ve reduced the final amount, added booze, and more spices to this. But that’s what a good basic recipe should be: adaptable. Make this on a lazy Sunday and enjoy it throughout the week. Makes just under a litre.

Basic Tomato Sauce:
2 tbsp extra virgin olive oil
1/2 onion - finely chopped
1 garlic clove - crushed
1/2 tbsp salt - scant
A good cracking of black pepper
1 small red chilli - deseeded and finely chopped
A pinch of chilli flakes
375g fresh tomatoes - really ripe and sweet
1.5 tins/cartons of crushed  tomato - about 600g
1 small handful of oregano - fresh or 1 tbsp dried
1 bay leaf
A good glug of red wine
A bit of sugar - if you want, I didn't add this

Sauce pan on stove at medium heat. Add 1 tablespoon of oil. When at heat add your garlic, onion, chilli (fresh and dried), bay leaf, black pepper and dried oregano if you’re not using fresh. Stir and sweat ’em out. When the onions are glossy and translucent, get your fresh tomatoes in with the other tablespoon of oil. Cook for 15 mins.

Now add the crushed tomatoes and glug that wine in. Reduce the heat to a gentle simmer, lid on, leave for an hour. In the final moments, if you’re using fresh oregano (I mean, how hard is this stuff to find? Grow some in a kitchen pot for a constant supply), roughly chop it up and stir it all in. Taste. Adjust seasoning. Add a bit of sugar if your tomatoes aren’t sweet enough.

Pan off heat. Transfer into a blender or use a stick blender to whiz it all up. Done! You can strain this mixture further and add a bit more water to make a pasata if you fancy it.

Orange Infused Braised Fennel

Some fennel arrived in my veg box this week, and I was left in a bit of a quandary. Since the Queen’s Jubilee celebrations this year, where I suffered a particularly bad Sambuca related incident, I have been unable to come within 10 feet of the stuff without gagging and likewise with anything resembling the aniseed tipple. Cue the mild consternation at my veg box opening. Can I even prepare the veg without feeling nauseous? How would I serve the fennel without strange Queeny related flashbacks?  The answer is braised. Braised in an orangy saucy gravy.

The original recipe actually required Sambuca, Pastise, Ouzo or any other aniseed flavored booze. Um. I really had to substitute this for Cointreau, and I would highly recommend any fellow Sambuca Sufferers to follow suit.

Braised Fennel Ingredients:
1 large fennel bulb
1 tbsp butter
1/2 tsp salt
1/2 tsp sugar
1 tbsp Cointreau
1/4 cup veg stock
1/4 cup water
1 tbsp fennel fronds
Zest of half an orange
1 tbsp orange juice

Trim the top off your fennel bulb, remove the fronds and lightly chop them up and set aside. You want to divide your bulb into 8, pieces. Keep them attached to the core so they don’t fall apart when you’re cooking.

Set a wide enough sauté pan on the hob where you’ll be able to brown each piece of fennel in one layer. Set it to medium high heat and melt your butter. Bring the heat down a bit and lay all you fennel bits in. Nicely brown one side. This should take around 4 mins. Sprinkle over the salt and sugar for caramelization. Turn to brown the other side.

Once evenly browned. Increase the heat and add your alcohol. This should quickly boil down. When it’s almost entirely evaporated, add the stock and water. Once this liquid starts boiling, bring the heat down low. Cover the pan and simmer for about 15 minutes. While this is simmering grate your orange zest – set aside.

15 minutes up? Remove that lid and let the sauce boil down to a glaze. Add a pinch of the fronds and the half the zest. Gently combine.

Plate up. Brush the saucy gravy goodness on the fennel. Sprinkle with the rest of the fronds and zest. Squeeze over with the orange. Done.

I can report that I ate the lot. It’s delicious. I even managed to share some with a friend with similar aniseed aversions and they didn’t gag either. So, a win in my books methinks.

Glut of Cucumbers: Simple Asian Cucumber Salad

I’ve been getting a lot of cucumbers in my veg boxes as of late, and I was simply not getting through them enough. So at times like these I really love to make this simple Asian salady side dish. There’s a lot of variations of these dishes across the swathe of Asia and the only reason I’m not calling strictly calling this a Chinese pickle recipe is because I’ve not added any rice vinegar (but it is cured with the salt). Serving cucumbers in this fashion is most like Korean namul and it’s those variations of veggie sides that I love most about Korean BBQ’s.

Simple Cucumber Namul Ingredients:
1 whole cucumber or 2-3 smaller varieties
1 tsp salt
1/2 tsp chilli flakes or 1 small red chilli
1/4 tsp white pepper
1-2 tbsp sesame oil
1-2 spring onion finely chopped (optional)
1/2 tsp sesame seeds (optional)

You want to slice the cucumber into long strips at around 2-3 mm thick. I used to do this by hand with a filleting knife, but my cousin and his wife bought me a voucher for a cooking store last year and I got a mandolin…man…I’m loving the mandolin. When you’ve got lovely long thin strips, cut away the cucumber seed areas. Yes, I know you can eat these, but for the purpose of this dish they add way too much water, so get rid.

In a sealable container add all the above ingredients and mix until all evenly coated. You might think that there’s just a bit too much salt in this, but the salt helps draw out the water from the cucumber giving them a nicer bite (and that water will eventually dilute the salty flavours anyway). Now put them in the fridge overnight and enjoy the next day.

This recipe is pretty adaptable to your tastes, you can even add a bit of soy, grated ginger or garlic if you would like. The veg is really interchangeable: cabbage, carrots, beans, bean spouts, radish, kohlrabi…some of these veg you’ll want to par boil. I’ve served my cucumbers with a congee made with rolled oats – a healthier version of congee perhaps, but mostly because I didn’t plan to cook the rice early enough for making nice creamy congee.

Macarons: Basic Recipe (French Meringue)

Right. Macarons. I make these a lot. I make them for my own birthdays, for my friends birthdays, for my friends weddings and by request from my mum to take back to Hong Kong. I have experimented with these an awful lot.

In my constant search for attaining that Macaron Nirvana I have: tried various French meringue recipes; Italian meringue recipes; used fresh eggs; used rested eggs; added egg stabilisers; bought an oven thermometer; broken my oven thermometer; bought a newer more accurate oven thermometer; warped my oven trays; bought new oven trays; single & double stacked my oven trays; used parchment paper; used steam to remove my macaroons stuck to parchment paper; bought silicon baking mats; blitzed my ground almonds; double sifted my ingredients; triple sifted my ingredients; mixed fast; mixed carefully; mixed methodically; piped sloppily; piped pedantically; laminated my own piping template; used a toothpick to pop air bubbles; rested my mixture for 30 minutes; rested my mixture for 60 minutes; baked them quickly in a hot oven; baked them slowly in a cooler over; curdled my buttercream; burnt the cream for my ganache; used way too much rosewater in mascarpone…and created a few delectable morsels amongst a sea of calamitous attempts.

And still, I would only consider myself a novice at macarons, as I can still be found crumpled in a quivering mess on my kitchen floor because the Macaron Gods have conspired against me. I have tweaked and amended many recipes until I reached one that was almost 80% consistent depending on the weather and ridiculously long rest time of an hour. And after some particularly stressful days at work I decided that even I should go to a macaron class at On Patisserie and see what I was doing wrong. Because cooking makes me happy. Don’t judge. I’m a de-stressing stress cooker.

I was 20 minutes late. But as I was the only one in the class who had actually made successful macaroons at home, I still managed to bombard the wonderfully charming Loretta Liu with a torrent of really specific questions (“when you’re ageing your eggs in the fridge, do you have a preference for fresh or pasteurised egg whites? How many extra grams are you factoring in for weight loss?”). After her class, and scrutinising my really hilarious note taking. I’ve tried her recipe again and it does work pretty consistently! Also, it’s actually a lot simpler than the one I’ve been faffing around with so before you start, it’s probably best that you know that you need to age your eggs whites in the fridge for 3 days (I was doing 5! Already, 2 days off my timeline), so get those egg whites in a bowl, cover with cling film and make sure you have the following kit:

Equipment you need to make French macarons:
A handmixer or stand mixer
A large plastic bowl - No to: glass, metal & ceramic
A fine mesh sieve
A spatular
Gel food colouring - not liquid colouring
2 good quality, heavy, baking trays (to double stack)
Silpat or silicon baking mat equivalent
A good quality piping bag with a 10 mm nozzle
A template for your piping - circles at approx. 4.5 cm

Aged those egg whites? Got all of your equipment? Now here are the ingredients for basic macaron shells:

French macaron ingredients:
140 g Egg whites - Rested in the fridge for 3 days
95 g Caster sugar
170 g Ground almonds
260 g Icing sugar
Gel food colouring - approx. 1/4 tsp

Egg whites out of the fridge and get them to room temperature. Sieve your almond flour into a large plastic bowl (double sift them if you want). Now sieve your icing sugar on top. Do not touch this mixture. You want to avoid the icing sugar getting too touchy feely with the almond flour (it’s an oily nut so might cause lumps pre mixing). Set aside.

Whisk those egg whites with a hand or stand mixer to glossy firm peaks. Add caster sugar gradually.

Gently fold the meringue into the dry ingredients using quick circular motions. This mixture is known as ‘macaronage’. If you want to add the food colouring, I’d do it now. I like to add half the meringue first, mixing relatively briskly, then gently folding the rest in. The trick (and man, is this a bugger of a trick) is getting the macaronage smooth, even and *just* the right consistency so you don’t knock all the air out and it holds a nice shape after you pipe it out. You hear the term ‘ribbony’ banded about a lot for this stage. I don’t know what on earth that really means. But you want it looking a bit like this:

See how you can still see some definition to those peaks? It is always better to err on the side of under mixing than over mixing. You cannot salvage over mixed macaronage. The mixture should hold in the piping bag while you pipe, and not dribble all over the place. (Been there, done that…boring and supremely annoying).

Prep your tray, place your template underneath your baking mat. Now for the piping. Forget all those swirly creative cupcake icing techniques you may have perfected. Macarons need a steady calm hand for uniformity. Get your 10 mm nozzle in your piping bag. Twist the bottom (or use a laundry peg) so when you fill the bag, mixture doesn’t come out the other end. Thumb and forefinger at the top, gently squeeze so your mixture is just about to come out of the nozzle. Holding your bag perpendicular to the tray, hold it at 5mm (the height of your macaron shell) and slowly add pressure and fill until you make a perfect circle. Stop adding pressure. Lift straight up! Move on to the next one. Pipe. Pipe. Pipe. Pipe. Done!

You have a couple of choices in term of removing those nippily peaks a top of your piped batter . Bang the tray on the counter to gently flatten them out (easy, but temperamental) or learn to pipe them flat (a bit more advanced and takes a bit of time. It involves piping as above them adding a semi circle flourish to cut the peak off with the nozzle)…check this dude’s mad pipping skills. Envious much? You should have enough mixture to pipe at least two sheets. Pipe it all and rest them for 20-40 mins until they form a skin and bake one tray at a time. If you can, I would advise double staking those baking trays. This simulates insulated trays, and means the base of your macarons don’t cook too quickly and help you form those much needed ‘feet’ on the base of your shells.

While resting your batter. Set your oven to 160°C. Remove that template. Bake for 10 minutes.

This is pretty important. Not all ovens are the same, and the above temperature and timing is not a golden rule, you have to learn to be at one with your oven for this stage. Mastering one’s oven is the hardest or at least most frustrating part in this whole process. The final hurdle to conquer after all that time. Once done leave them to cool before carefully removing ’em from the baking mat. You’re now ready to fill them with a plethora of delicious fillings once they are fully cooled down. Pair up your shells according to shape similarity. Line one side facing up the other facing down. Pipe your fillings onto the ones facing up. Sandwich them and keep ’em in the fridge for 12-24 hours before you serve them up! Left over shells can be stored in the freezer.

For those of you crazy enough to embark on this macaron madness expect troubled waters. This is a pretty good guide in terms of trouble shooting. Good luck and godspeed.


Warm Butternut Squash & Kale Salad with Tahini Yogurt Dressing

20121106-210922.jpg
Autumn is officially here, and after a cycle ride home through the brisk chill where I’m definitely justifying those natty leather gloves I spied in the winter sports shop (I mean, I’ll use them for cycling as well as snowboarding…totally worth it!), I’m also feeling the need for a hearty warm salad.

This is quite heavily influenced by the wonderful Yotam Ottolenghi, who’s thoughts behind seasonal ingredients and saving meat eating for special occasions I greatly admire. So with the chilly weather still in mind, think of the following as an off piste Ottolenghi dish.

Salad Ingredients:
1 large butternut squash - skin on, cut into wedges
2 red onions - cut into quarters
2 ample handfuls of curly leaf kale - roughly shredded
3 tbsp olive oil
2 tbsp raw nuts - I went with peanuts
2 pinches of dried herbs - I went with rosemary & oregano
Sea salt & black pepper - approx 1/4 tsp each
A few basil leaves to garnish

Get your oven to 220°C. While that’s heating up, toss your butternut squash and onions in a bowl with the olive oil, dried herbs, salt and pepper. When evenly coated, put onto an oven tray lined with some foil or parchment and whack it into the oven. Cook for 30-40 mins, the onions may cook a bit faster so keep an eye on them. Take this time to toast your nuts in a bit of olive oil and salt until nicely brown – set them aside. The kale will only take around 5 minutes to cook so make your dressing beforehand.

Yogurt & tahini dressing:
2-3 tbsp Greek yogurt
2 tbsp tahini
1 tbsp lemon
1 clove garlic crushed
Salt to taste
Water for preferred consistency

In a small bowl, whisk together the yogurt and tahini. I only had Chinese sesame paste, which let’s face it is basically tahini…only more toasted tasting. Add the lemon juice and crushed garlic. I was fresh out of garlic so opted for garlic salt instead so I omitted the ‘salt to taste’ bit. Keep whisking and add your water a little at a time until you get the right dribbly consistency for dressing. You only need a couple of tablespoons of this, keep the rest in the fridge for later.

In the last few minutes: get your kale cooked in some boiling water. Once done strain and shake out the excess water. In a bowl gently toss the kale, squash and onion with half of your toasted peanuts. Now dress on a plate and drizzle some of that creamy yogurt sesame goodness. Finish with the rest of the toasted nuts and basil leaves. I gobbled the lot, but as a side dish I’d imagine this would feed two.

Homemade yogurt: a cultured endeavour

I’ve recently decided to get Abel & Cole to deliver a small exotic veg box to me once a week. Their service is great and it has really got me out of a slump in terms of the total lack of inspiration I get whenever I walk into my local Tesco Express. I always have such high hopes when I walk into that Tesco, maybe I’ll get inspired and whip up something amazing. But after doing my zombie rounds, I always end up with a box of eggs; a courgette; some beetroot; and cherry tomatoes…without fail. So upon the arrival of my maiden veg box, brimming with fresh shiitake mushrooms; curly leaf kale; purple carrots; and rainbow chard…I could have cried tears of joy. What’s more amazing is that as well as getting a box of organic exotic veg – every other week I get something free. One week I got orange juice the next a litre of semi skimmed milk.

It is this bottle of milk that this post shall focus on. As much I have every intention to finish a litre of milk, I simply don’t eat enough cereal or drink enough tea to justify this amount of milk without it going off. And sad to say, I have in the past let a perfectly good amount of milk go off and had to lumpily pour it down the sink. So the other day when I checked the fridge and saw this gratis and completely unopened bottle of milk about to turn – I decided to do something about it.

Things you'll need to make yogurt:
1 litre of milk - any type is fine
2-3 tbsp plain yogurt with live cultures - your starter
large pot to heat milk - or slow cooker
sugar or jam thermometer
glass bowl big enough for your milk
whisk
sieve
Jam jars or a big enough glass container for your yogurt

So first you want to pasteurise your milk. Get it in a pot on your stove and heat it ever so slowly (to avoid burny milk) to 82°C – I actually did this in my slow cooker. Once it reaches that temp remove from heat and let it cool to 43°C. While cooling, put your jams jars in the sink and submerge them in hot water. Basically you don’t want cold jam jars for when you transfer your milk and yogurt mixture. Hot liquid and jars: friendly bacteria sexy times. Pour hot water into your glass bowl now too, you’ll need it for the next step.

When your milk has cooled enough get that hot water out of your bowl and pour your milk in. Add those tablespoons of yogurt starter and whisk up a bacillus party! When mixed thoroughly get your jam jars outta the sink and decant the milk mixture in through a sieve. Now place those jars in a warm place and don’t touch them for 8-12 hours – your bacteria like a bit of calm so they don’t die but multiply…I’m sure there’s a rap lyric in there somewhere…oh! Haha, brilliant. Pinoy hip hop. God, I love the internet. I’m just going to go ahead and let that play in the background while I continue to write this…Anyway, I put my yogurt vessel in the oven with the light on overnight.

The next day you should have made beautifully set yogurt! Now put it in the fridge until it’s cooled and ready for you to eat.

I was surprised at how light and creamy mine turned out. The yogurt I used as my starter was quite sharp and I sort of expected it to cultivate a similar flavour. Nope. I served my first ever batch of yogurt with mixed berries, some shredded basil and a drizzle of honey. Delish. If you want a Greek style thicker set yogurt, strain your yogurt over some muslin cloth and sieve for 2-3 hours in the fridge. Also, it turns out that the good bacteria doesn’t denature when you freeze it, so when you’re almost done eating don’t forget to put a few tablespoons in the freezer so you can use your own starter next time. Happy cultivating.

Categories